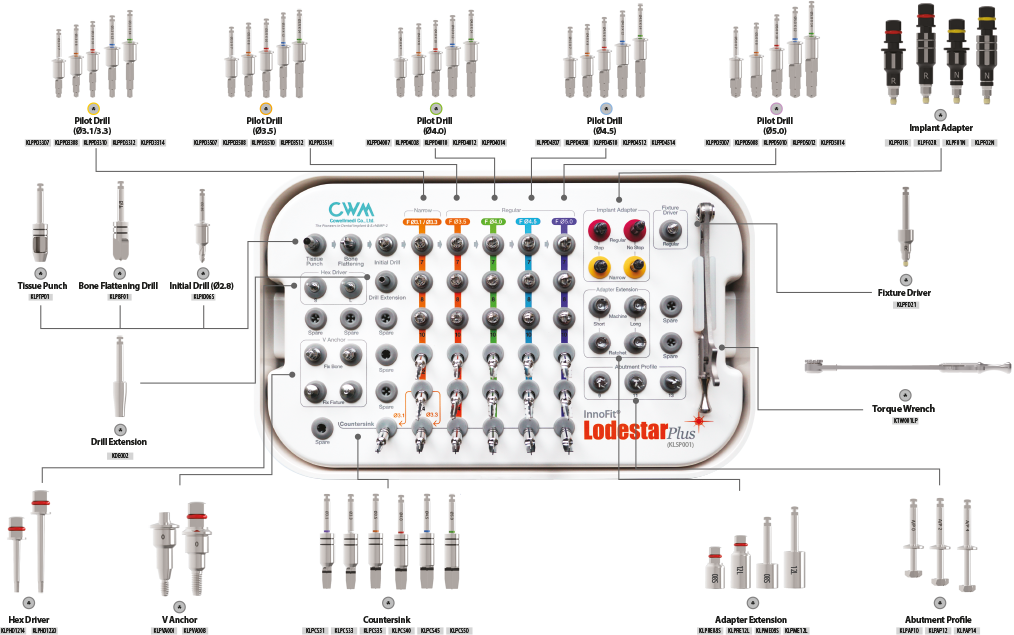
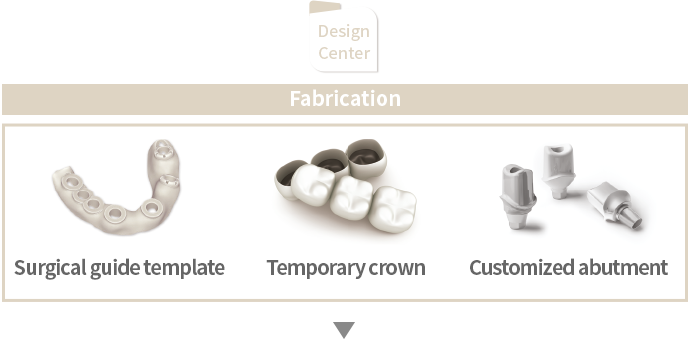
InnoFit® Lodestar Plus Kit
[KLSP001]
- A total guided surgery solution applicable to various types of clinical cases.
- Exclusive for the INNO Submerged and Submerged Narrow Implant System.
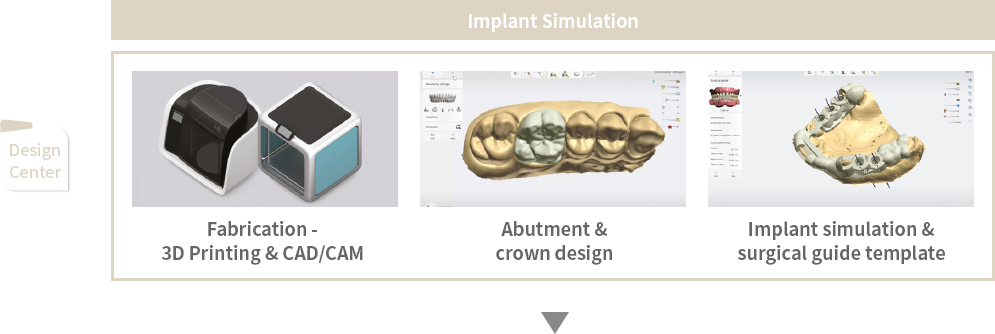
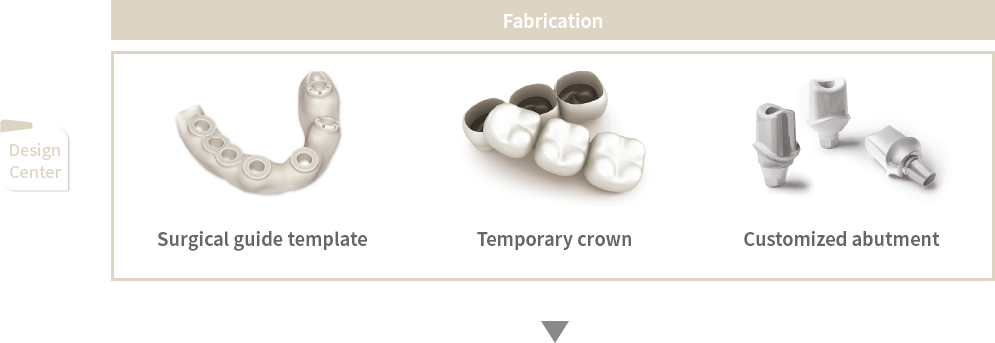
Workflow
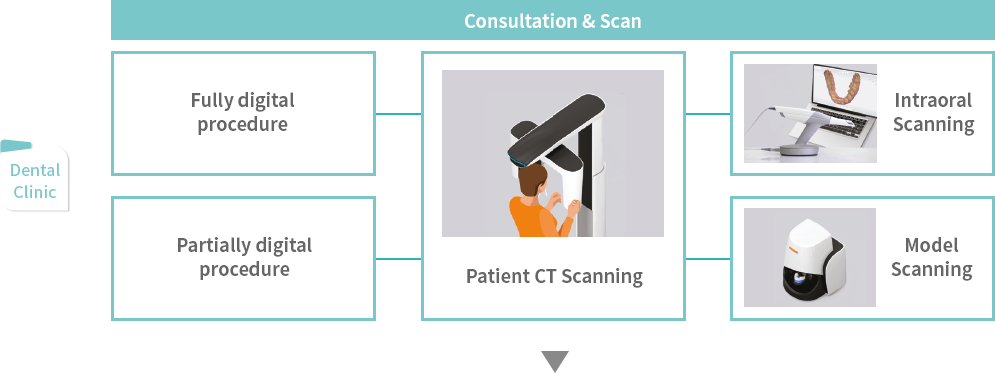
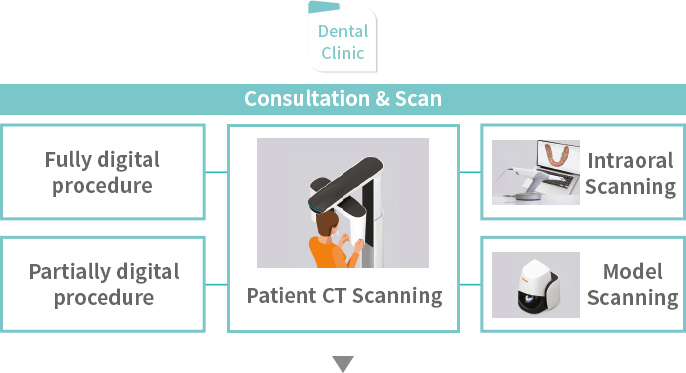

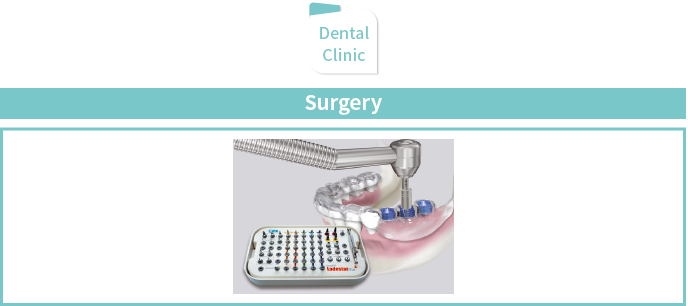
Preparation before Operation

Disinfection of surgical guide template
Disinfection must be done before the operation. Immerse the surgical guide template into the alcohol and chlorhexidine solution in a ratio of 9:1 or disinfection fluids such as CidexOPA, betadine, etc. for more than 20 minutes. Then rinse with the saline solution and install in patient’s oral cavity.
Installation of surgical guide template
• Check if inward of surgical guide and outward of teeth are accurately contacted through
the windows of mounted surgical guide template. In case of insufficient scan data,
delete and adjust the inner side of the surgical guide template to contact precisely.
• Install the surgical guide template while scanning CT to check implantation path and precision
before the operation. (Implantation path may also be checked in post operation by
scanning CT with installation of the surgical guide template).
Verification of dental implant
Check if marked dental implant is in the surgical report.
Confirmation of protocol
Confirm the surgical report and surgical protocol for the last time.
Confirmation of protocol
Confirm the surgical report and surgical protocol for the last time.
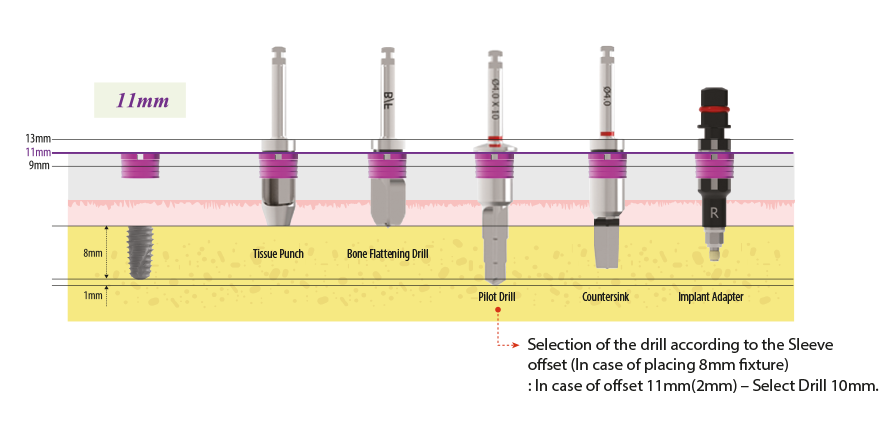
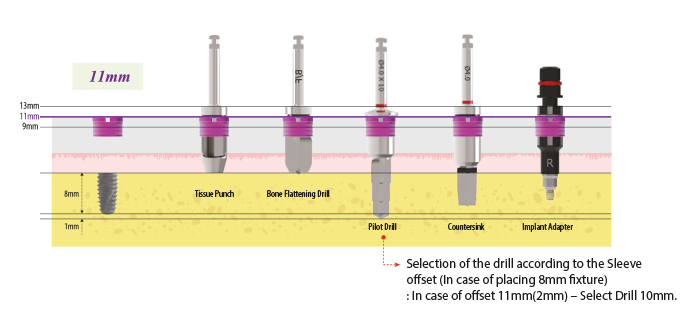
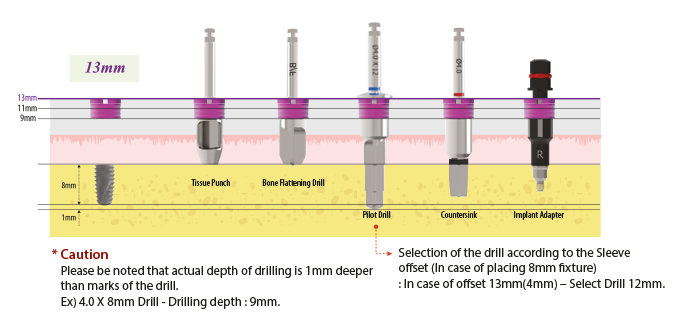
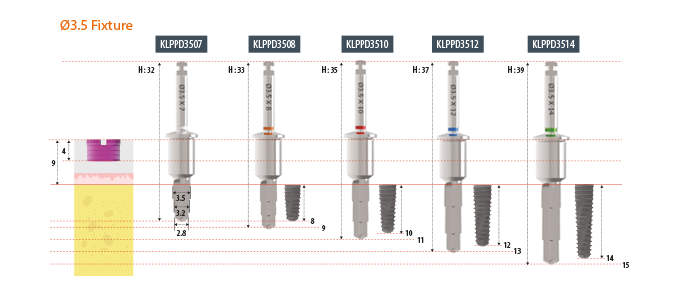
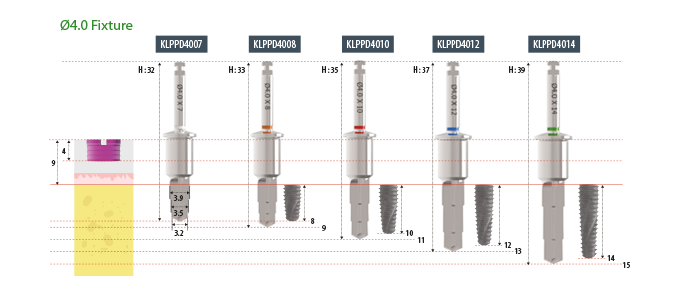
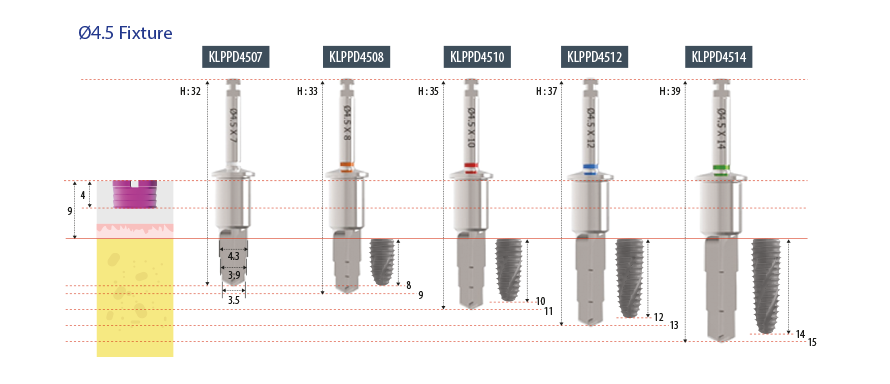
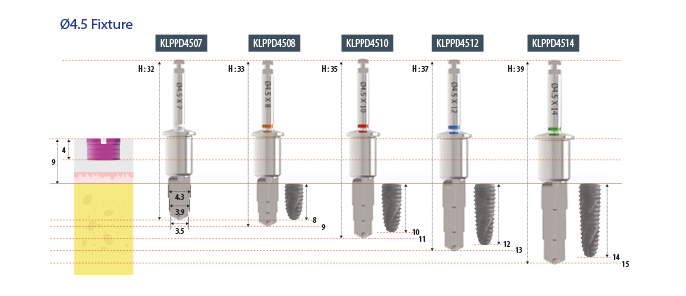
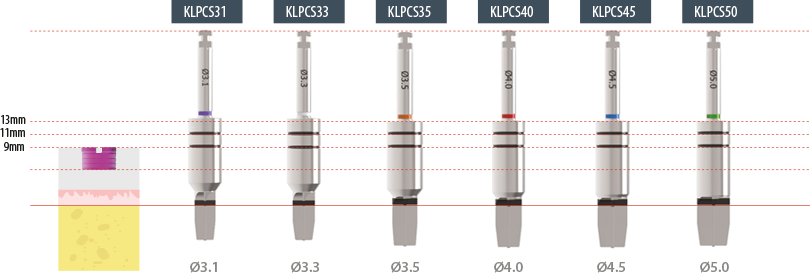
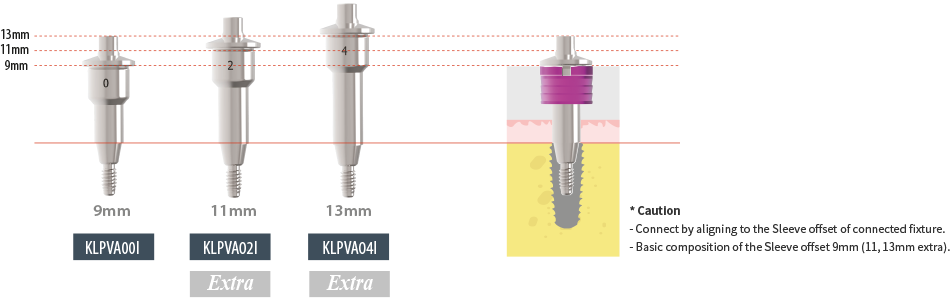
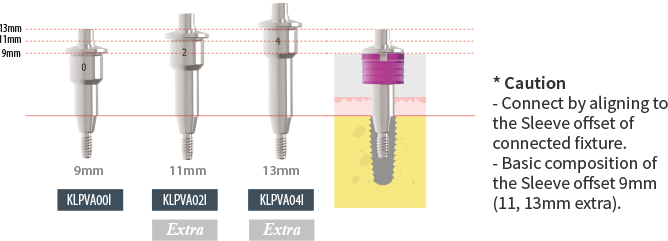
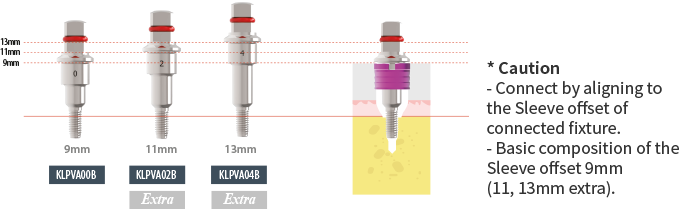
Comprehension and Usage of Offset
- The basic length from the fixture platform to the top of the Sleeve is 9mm.
- In case that gingival is thick or fixture needs to be placed deeper due to low bone density, use the Sleeve 2 or 4mm upright to the top.
- The higher offset value, the less accurate it will be, so use 9 mm if possible.
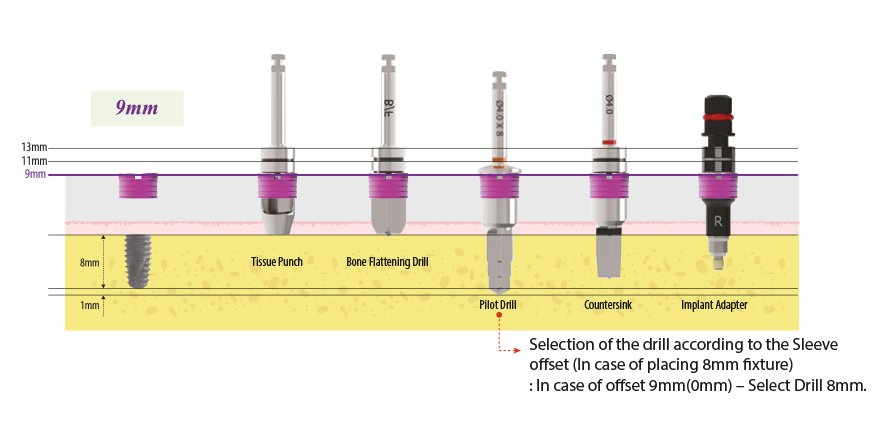

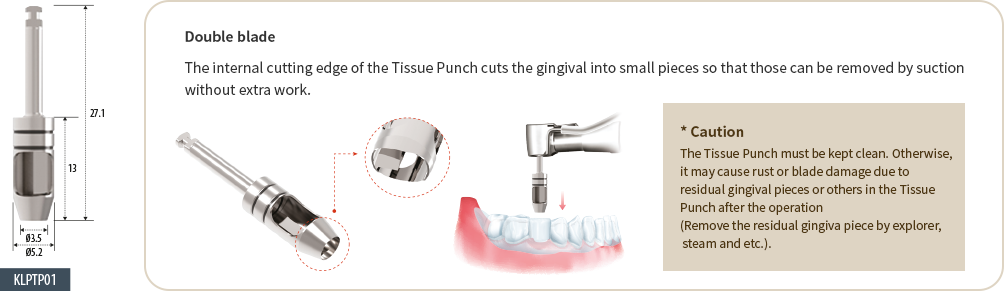
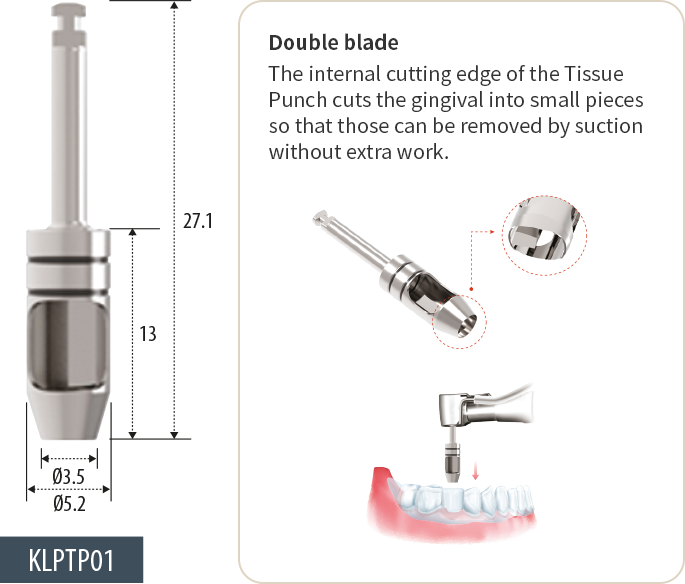
Tissue Punch
- Used for soft tissue elimination (the gingiva in the position where the implant is to be placed can be incised in a circular shape).
- Hemostatic effect, small scar, fast wound healing affect is occurred after the operation due to small diameter of tissue punch.
- Able to apply offset (9mm, 11mm, 13mm).
- 50rpm without irrigation.
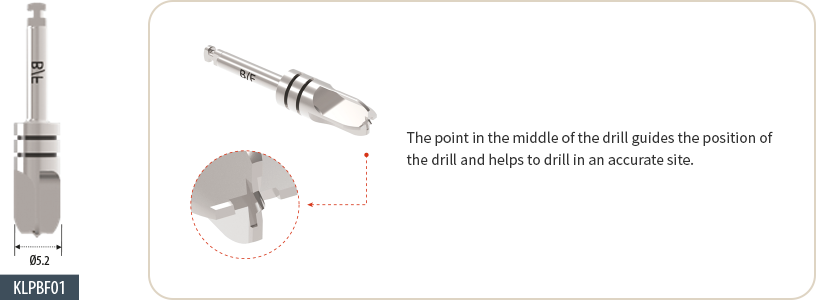
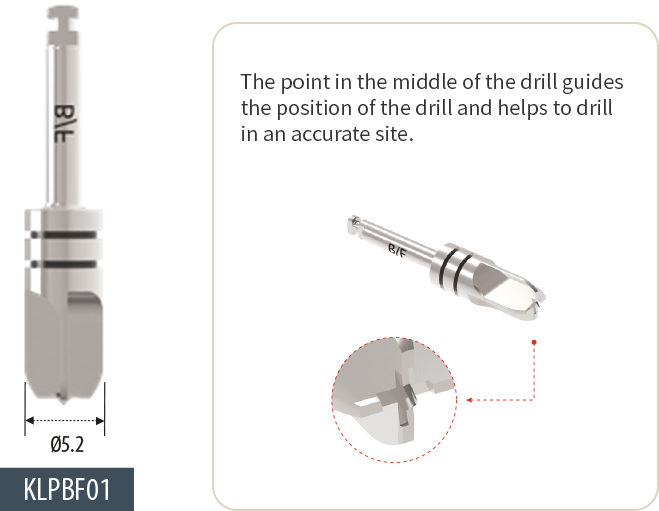
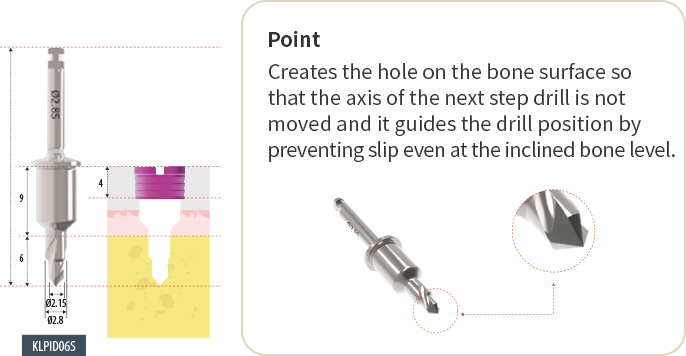
Bone Flattening Drill
- Flattens the bone level of operation site.
- Inclined bone level may glide the drill and cannot drill as planned.
- Eliminate the soft tissue after using the Tissue Punch.
- The point in the middle of the drill guides the position of the drill and helps to drill in an accurate site.
- Able to apply offset (9mm, 11mm, 13mm).
- 400rpm without irrigation / 800 rpm with irrigation.
Initial Drill
- High speed, 1000rpm with irrigation.
Pilot Drill
- Low speed, 50rpm without irrigation/50Ncm


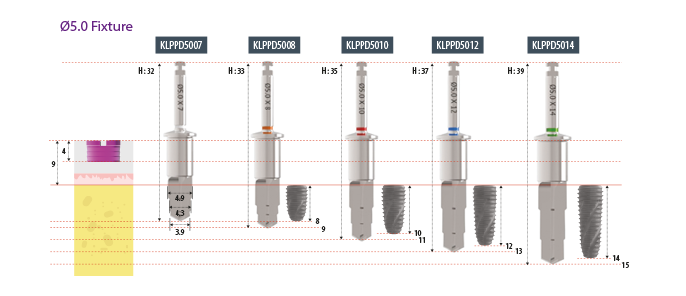
Countersink
- Expand the cortical bone in D1/D2 bone to prevent excessive implantation of the fixture.
- Able to apply offset (9mm, 11mm, 13mm).
- 50rpm without irrigation.
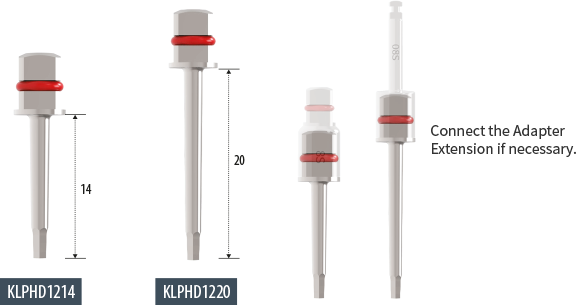
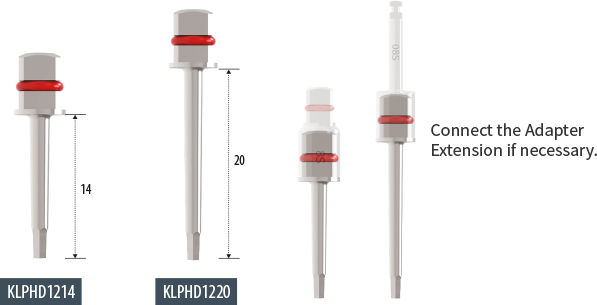
Adapter Extension
- In case the Implant Adapter is too short to use, connect the Ratchet or Machine Adapter Extension to place the fixture.
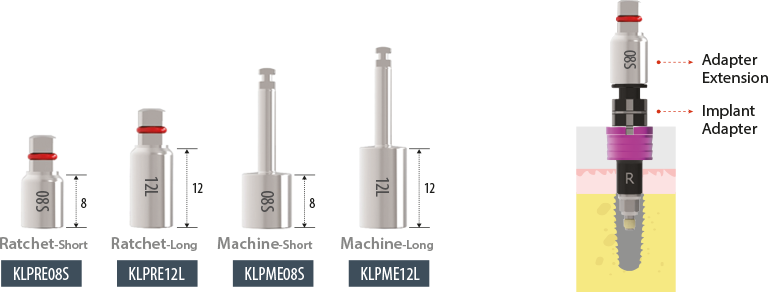
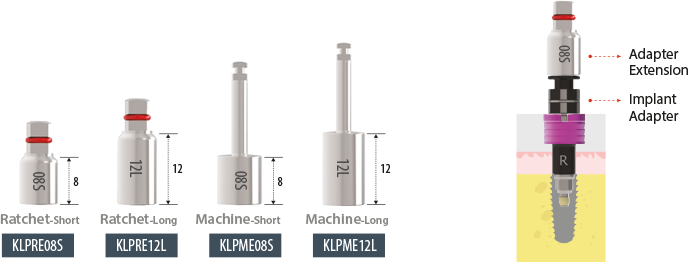
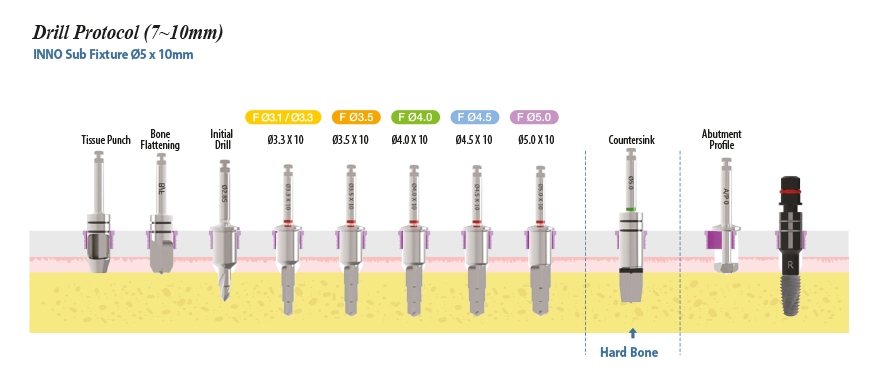
Implant Adapter
- Move fixture to the Sleeve to implant safely.
- Match the depth of laser marks of the Sleeve offset and Implant Adapter.
- When implanting the fixture, the direction of the Implant Adapter and directional identification groove of the Sleeve are matched,
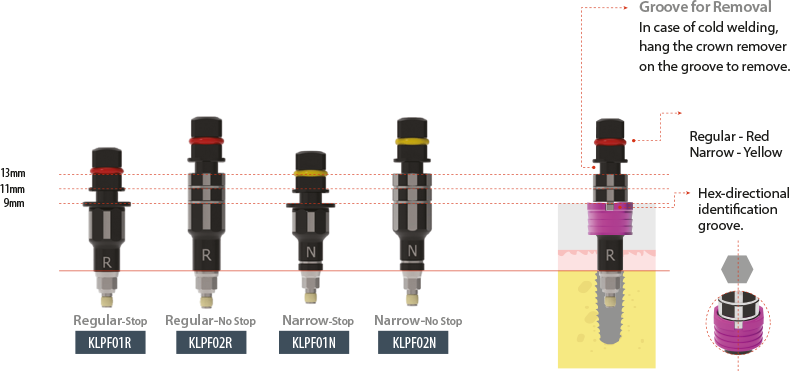
it lines with the hex direction of temporary abutment. - In case the Implant Adapter cannot be removed by cold welding after placing the fixture, hang the crown remover on the groove to remove.

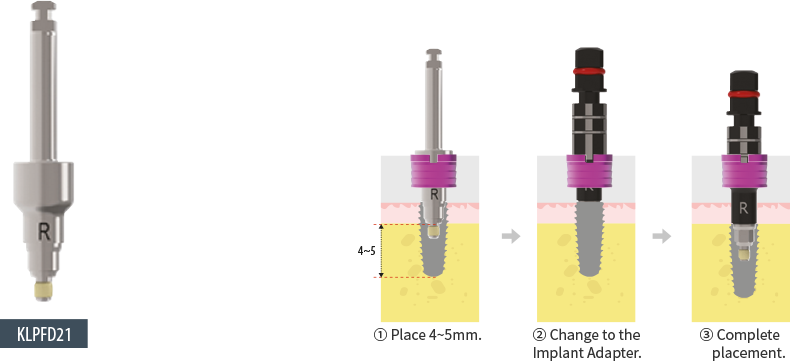
Fixture Driver - Molar
- Use in case the Implant Adapter can not be used due to small size of opened mouth or narrow gap between antagonist tooth.
- After implanting 4~5mm, change to the Implant Adapter to complete placement.
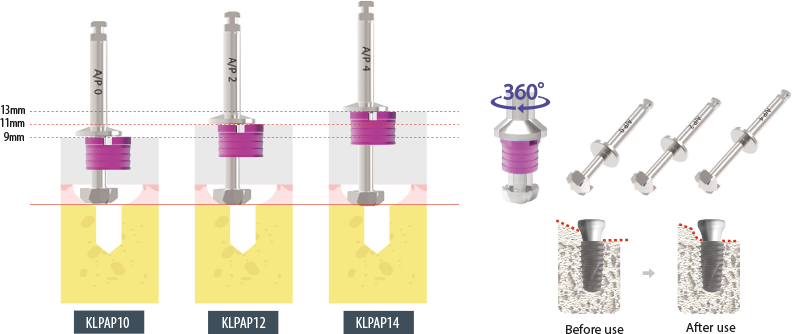
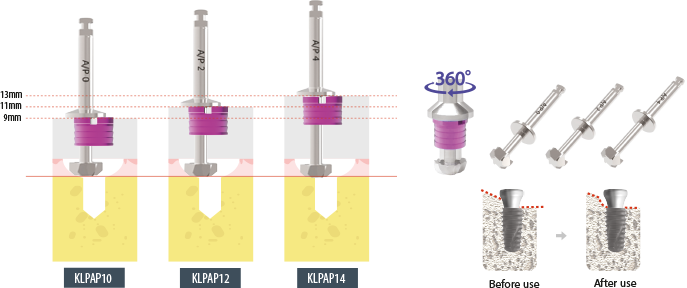
Abutment Profile
- Used for elimination of the alveolar bone that interferes with the accurate connection of abutment. Remove residual bone by rotating and drilling 360 degrees.
- In case of thick cortical bone, higher the drilling rpm and use with irrigation (within 100rpm).
V Anchor - Fix Fixture
- Used for elimination of the alveolar bone that interferes with the accurate connection of abutment. Remove residual bone by rotating and drilling 360 degrees.
- Connect the 1.2 Hex Driver to implanted fixture to prevent the movement of the surgical guide template in cases as edentulous.
V Anchor - Fix Bone
- Fix the V Anchor using the Torque Wrench in the hole made after initial drilling to prevent the movement of the surgical guide template in cases as edentulous.

Ratchet 1.2 Hex Driver
- Use in case of connecting the Cover Screw or Healing Abutment.
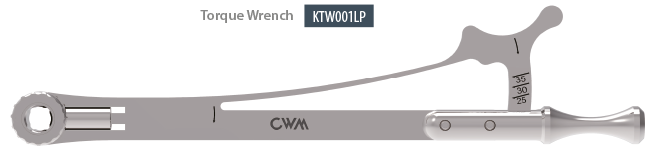
Torque Wrench(Square)
- Use to implant the fixture (Connect to the Implant Adapter).
- Use after connecting to the 1.2 Hex Driver.
- Use after connecting to the V Anchor (Fix Bone).

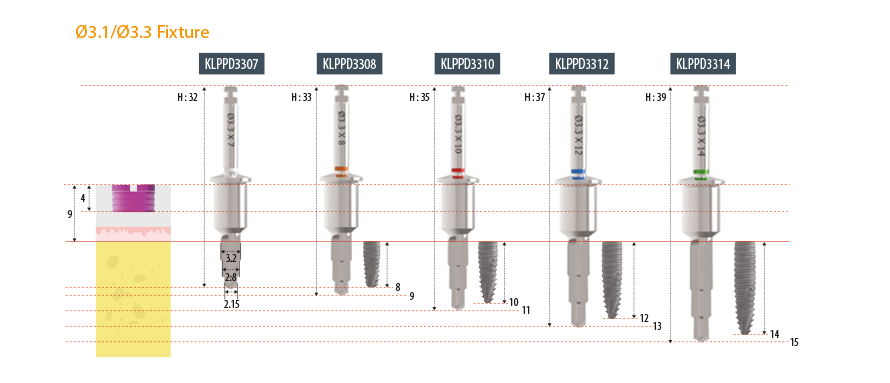
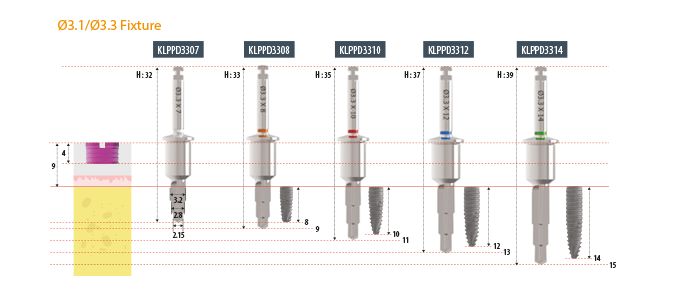
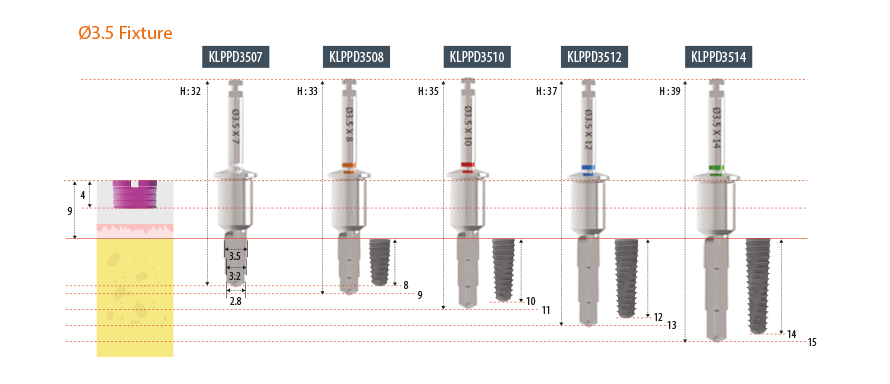
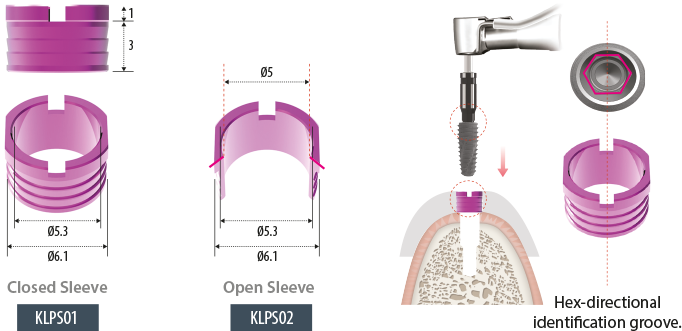
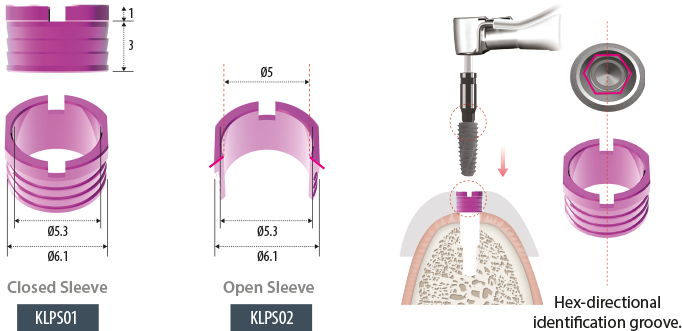
Sleeve
Drill Protocol
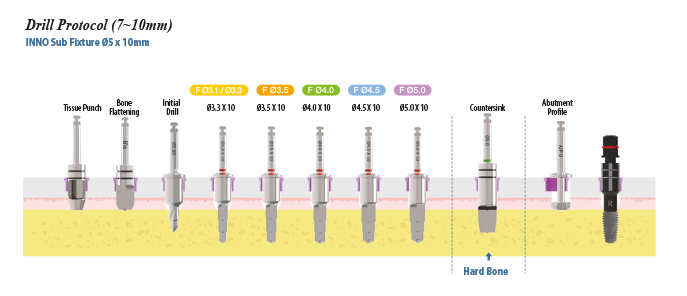
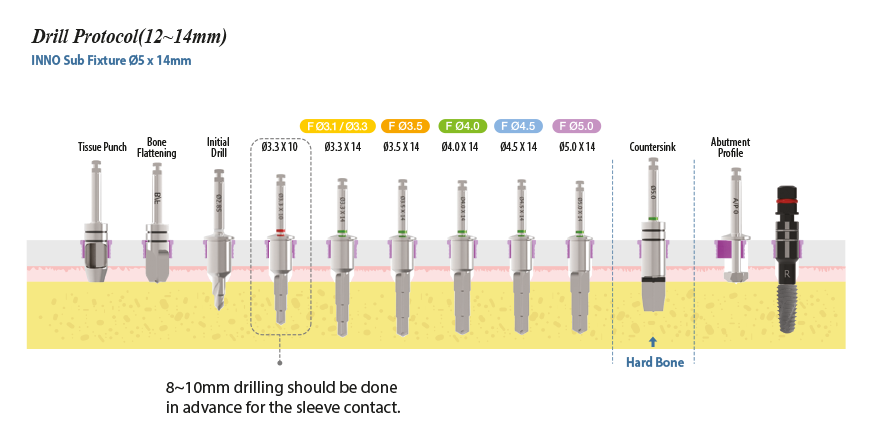
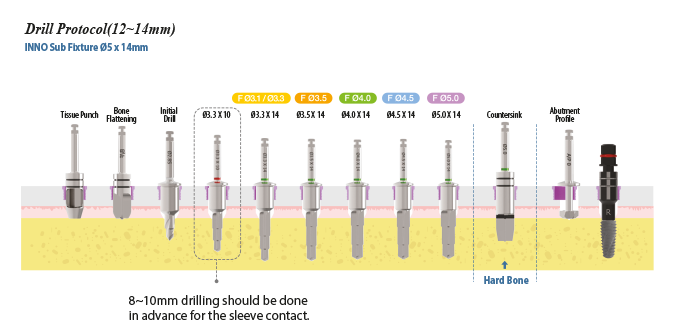
Drilling method
- Make sure with drilling in a desired direction without a change in path through the primary drill contact (A) with the hole created by the previous drilling and the secondary contact (B) with the sleeve.
- Create the hole using the initial drill and insert the next drill into the hole made during the previous step and drill after achieving the drill and sleeve contact (A&B).
- If drilling only with the sleeve contact (B) without the drill contact (A), the path may not be correct.
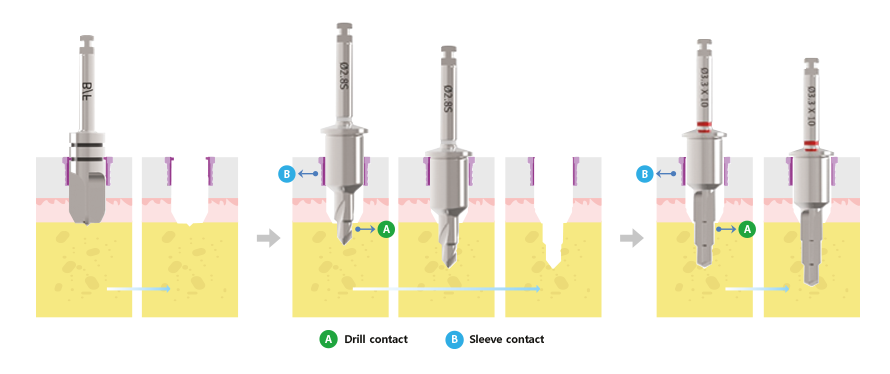
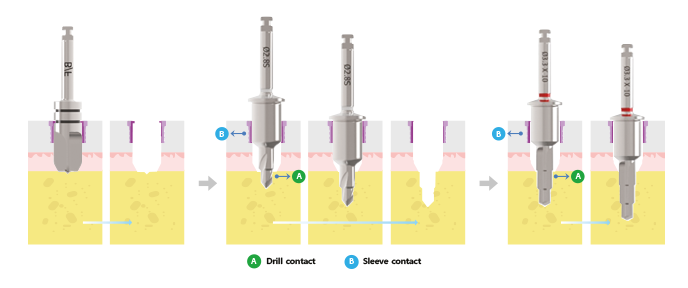
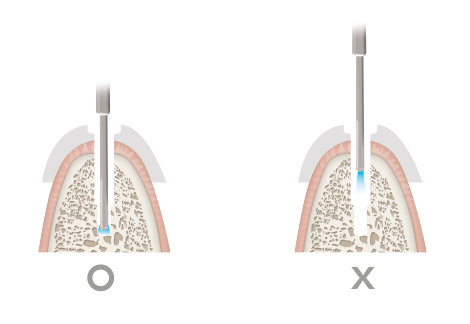
* Precaution when irrigating
- Irrigate enough to the end of the drill hole.